On Instinct
Prototype Walkthrough and Guide
Prototype Guide - Walkthrough
On Instinct
This mission is just a pain; there's no way around it. This battle isn't so much difficult as it is tedious and excessively lengthy. If you have acquired the right upgrades, however, you can make this mission much less of a trial.
The essential upgrades to have here are the Groundspike Graveyard Devastator, the Shield Power, and Blade Air Slice. Optional upgrades, but ones that would certainly help, are all of the Health Boost, Jump Boost, Sprint Boost, Critical Mass Boost, and Consume Boost upgrades. If you have EP to spare, consider purchasing Hunter Dirtnap as well.
 Elizabeth Greene's horrific true form. |
Mission Objective: Defeat Elizabeth Greene
Elizabeth Greene has an arsenal of damaging and troublesome attacks; from afar, she will frequently fire a number of tracking, green projectiles, and at medium range, spew out a ridiculous amount of boulders. Get too close, and she'll slap you with her tentacles. To make matters worse, there are Hunters and other Infected prowling the streets, and you're their number one target.
The health bar in the top-right corner of the screen is Greene's health bar, and indicates how much more damage she can sustain. The three groups of divided bars below Greene's health bar represent the health of her tentacles and spine; before you can damage her directly, you must deplete each of these bars. When the three appendages have been damaged enough to deplete the three bars, Greene will fall, allowing you to chip away at her actual health bar. You'll have to stun and damage her in this fashion a total four times to completely deplete her health bar.
The Groundspike Graveyard Devastator and the Shield Power are your two biggest assets during this fight. To perform the Groundspike Graveyard Devastator, you must be in Critical Mass. To achieve Critical Mass, you need to fill your health bar completely—and then some. Due to the number of Hunters and lesser Infected in the streets here, achieving Critical Mass is quite easy.
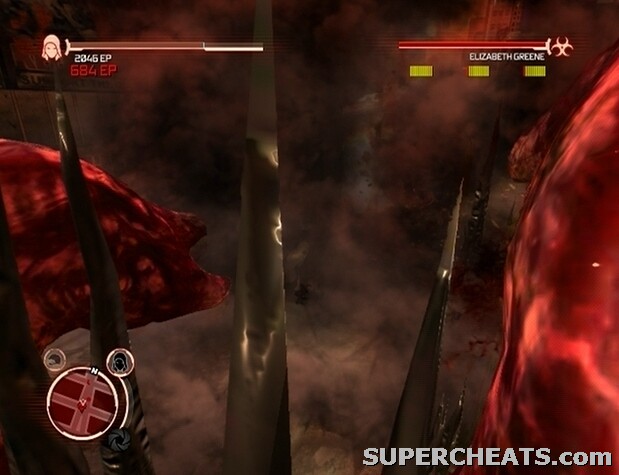 Use the Groundspike Graveyard Devastator to severely damage Greene's appendages. |
Greene is planted in the middle of a four-way intersection; there are parallel streets on either side of this intersection. Duck down one of the parallel streets to keep out of range of Greene's projectiles. The streets on either side of Greene's location are packed with Infected, including the fat, brute-like variety. Whenever you head down one of these streets, you are likely to be rushed by four or five of these brutes; these Infected yield a sizeable amount of health when consumed, so with the Blade Power equipped, Grab and Consume a few of them to fill up your health bar. If there isn't any of this type of Infected in sight, just Grab Infected Civilians and quickly Consume them.
By far the quickest way to reach Critical Mass is by consuming Hunters; this is where the Blade Air Slice attack comes in. To perform Blade Air Slice, equip the Blade power, lock-on to a Hunter, and press the Y/Triangle button while in the air. This attack will nearly kill the Hunter with a single hit; just hit it with one or two basic attacks as a follow-up and a red DNA strain icon should appear up above its head. When the red DNA strain icon appears above the Hunter's head, Grab and Consume it to regain an unmatched amount of health.
Once you've reached Critical Mass, equip the Shield Power and start sprinting toward Elizabeth Greene's location. While sprinting with the Shield Power equipped, Alex will hold the shield out in front of him and use it to push aside enemies and block projectiles. If Alex doesn't take out the shield, release RT/R2 for a moment and press it again. Sprint all the way over to Greene; the Shield is able to deflect her green, tracking projectiles, but likely not the rubble she spews out; you'll have to dodge to the side to avoid the boulders. There is still a chance that you could be hit by a projectile and thrown back, but you should be able to muscle your way through unharmed. When you are near enough to Greene, she will attempt to smack you down with one of her tentacles; circle around her in an attempt to dodge this attack, and try to get as close to her as possible before performing the Groundspike Graveyard Devastator.
 Equip the Shield Power and Sprint to get close to Greene. |
To perform the Groundspike Graveyard Devastator, you must hold the X/Square and Y/Triangle buttons at the same time for several seconds. If given enough time, Alex will enter the Devastator animation. Once in this animation, he may sustain minimal damage, but he will follow through with the Devastator to its completion. The Groundspike Graveyard Devastator is likely to attack each of the three targets at once, and has the potential to damage them significantly. If you are hit at all while charging the Devastator, try to dodge Greene's tentacle and get close again. If the hit takes you out of Critical Mass, Sprint back to either of the streets parallel Greene's location and Consume more enemies to get back to that point. Repeat this tactic until all three of the sectioned bars below Greene's health bar have been completely depleted.
When all three targets have been attacked to depletion, Greene will fall, allowing you to attack her directly. She appears to remain in this position until a set amount of health has been drained, but she may retreat if you aren't quick enough. If you are still in Critical Mass, perform the Groundspike Graveyard Devastator again, otherwise just slash away at her with the Blade Power equipped.
Once a certain amount of damage has been dealt, Greene will retreat momentarily. Take the time now to Consume any Infected in sight to reach Critical Mass. When Greene re-emerges, Glide and Airdash as far from her as you can, because she is about to perform an incredibly damaging attack.
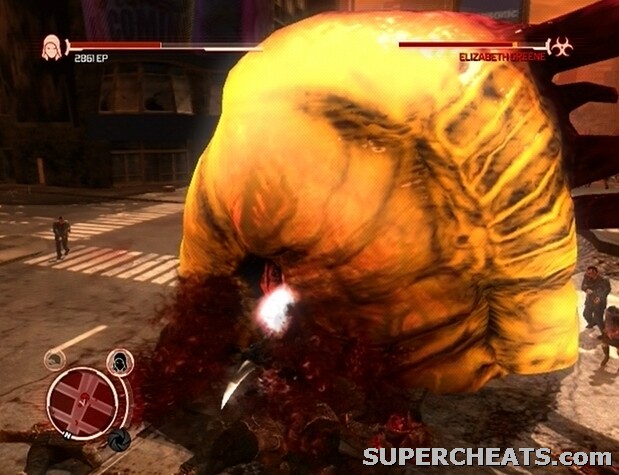 Equip the Blade Power and attack Greene while she is stunned. |
The military soon get involved, and are of absolutely no help. Don't even bother trying to hijack a tank or helicopter, as the vehicle would likely be destroyed in seconds anyway. Just stick to the Groundspike Graveyard Devastator and Shield Power strategy outlined above.
Things seem to get progressively tougher as Greene's health bar becomes less and less. The number of Hunters steps up, and they seem to target you exclusively. If you have acquired the Hunter Dirtnap move, you can use it to get an annoying Hunter out of the way; to perform this manoeuvre, first Grab the Hunter, then press the B/Circle button to throw down and stun the creature momentarily. The Hunter won't stay down for long, so quickly be on your way. With the Air Blade Slice attack, however, you can quickly damage and Consume Hunters to reach Critical Mass.
Again, if you take enough damage to fall out of Critical Mass once you reach Greene and are unable to perform the Devastator, retreat back to one of the side streets and consume more Infected until you're back up to Critical Mass.
Avoid hitting any of Greene's targets with an attack other than the Groundspike Graveyard Devastator, because as her appendages become more damaged, she is prone to let off a shockwave that can deal a ridiculous amount of damage. If you're close to Greene and you notice black and red streams of energy, followed by the screen shifting to grey, Glide and Airdash as far from her as you can to avoid getting caught in the blast.
This mission requires time and patience. You'll have to stun Greene a total of four different times and chip away at her health bar each time to kill her completely. The video below (edited for time) exemplifies the strategy outlined above. If done correctly and luck is on your side, this battle will be over soon enough.
i frgt. every time she comes out, and the screen turns yellow, airdashes are not enough, since i experienced a lt of damage during this process. i recommend you go to the parrallel street mentioned above as fast as you can, and climb the building.
also, every time she goes back down, she leaves a lot of health orbs behind. DO NOT get these. it'll leave you straight in the line of attack for her rocks, orbs, and tentackle. hope i helped
Prototype rocks !!!!
this walkthrough isnt totally correct. i hijacked a tank twice, and managed to deplete her 3 health bars pretty quick once she came out. in fact, it won me half of the battle. just remember to fire both your primary and secondary ammo at once at her.
prototype rocks !!!